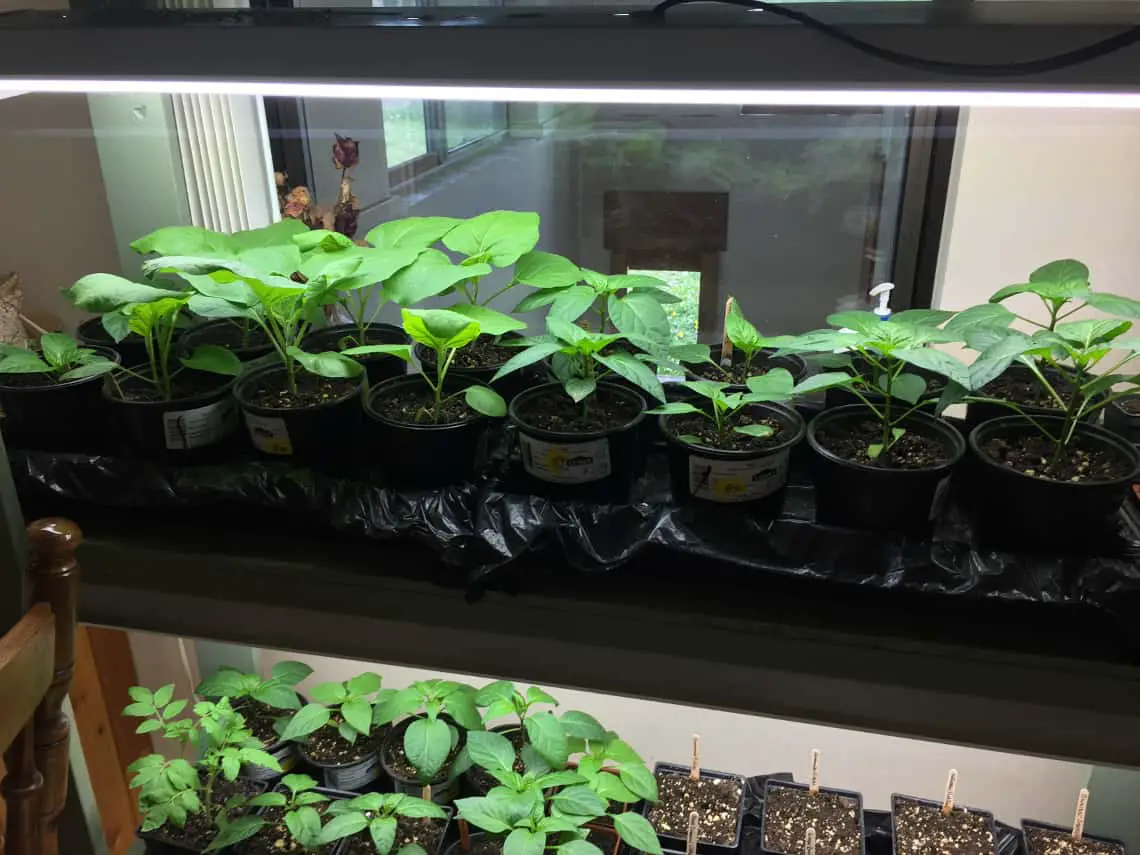
We grow lettuce, spinach, greens and different herbs indoors all winter long for our eating enjoyment.
We also start our garden seedlings indoors, transplanting them in the garden when it gets warm enough outside.
With a short growing season due to our northern latitude, starting plants indoors increases our growing season by several weeks.
This is all made possible by utilizing a plant grow frame with grow lights.
To be able to grow herbs, salad and other greens inside during the winter and to start seedlings indoors for the spring garden, we needed a place to grow them.
I’ll share how I built our grow frame, what grow lights we found to be the best and how I added electrical power to the grow lights.
The 4 shelf grow frame I built works just as well and is sturdier than most 4 shelf grow frames we could have purchased, costing $500 to $600 ordered off the internet.
But I built this DIY grow frame for a cost of about $250.00 with four 4′ LED grow lights!
Materials List
- Four 1″ X 4″ X 8′ boards, cost about $4.50 each or about $9.00 total
- Eight 1″ X 2″ X 8′ boards, cost about $3.50 each or about $28.50 total
- One 4′ X 8′ sheet 7/16″ thick OSB, cost about $8.50 total
- Four single gang nail on plastic electrical boxes, cost about $2.00 total
- Four 15 amp electrical plugs and covers, cost about $4.50 total
- 25′ 14/2 with ground electrical wire, cost about $13.50 total
- One 3 prong electrical plug, cost about $3.00 (Levitron 15 amp 125-volt 3-prong plug)
- 2 pounds of 1 1/2″ dry wall screws, cost about $4.50 total
- Eight 1″ dry wall screws, cost negligible
- Four 4′ shop light style Grow Lights 4000 lumen, 4000K color temperature range great for seeding and vegetable growth made by PowerPAR. (link to Amazon) Takes 40 watts of electricity each. Cost around $60 each
Tools Needed
- Circular Saw
- Tape Measure and Pencil
- Drill and Bits
- Phillips Screw Driver #2
- Sand Paper and Sanding Block
Making The Grow Frame
This grow frame can be made in a day or less. Its design is simple yet functional and sturdy.
The grow frame’s height can be adjusted to fit the height of the ceiling where you will put it.
The ceiling where we planned to place our grow frame was only 7′ 6″ high so we made our grow frame 7′ high with 19″ open space between each shelf.
I started by constructing 5 identical shelves. The 5th shelf is actually the top of the grow frame.
The bottom shelf rests entirely on the floor which creates a stable base for the grow frame.
The surface of each shelf is a 12″ X 4′ piece of OSB. After cutting it I sanded the cut edges smooth.
The frame for each shelf is made out of 1″ X 2″ boards.
See the Frame Drawing Diagram for the measurements I used for each piece of the frame.
The distance that separates boards #1 and boards #2 is determined by the mounting method of your grow lights.
For the PowerPAR 4′ shop light style grow lights the distance between boards #1 and boards #2 is 8 1/2″.
The grow light needs to be able, if needed, to be raised and lowered to be placed about 2″ above the tallest plant growing on that shelf.
The PowerPAR lights (link to Amazon) come with complete mounting hardware.
This hardware consists of “J” hooks to screw into the mounting boards (#2 in the frame diagram), “S” hooks that fit into the top of the lights.
And comes with a chain that allows for the raising and lowering of the light.
After constructing the 5 shelves, I choose one for the bottom shelf.
On a flat surface with my wife holding each 1″ X 4″ X 7′ board in turn straight up against it, I placed two 1 1/2″ dry wall screws through the 1 X 4.
(See the bottom of the framing diagram).
Once the bottom shelf was in place I measured, marked and with my wife holding the next shelf I placed two 1 1/2″ dry wall screws through each 1 X 4 and into the shelf.
This procedure was repeated for shelf #3.
For the top shelf I laid the frame on one side and screwed in the top shelf.
I choose dry wall screws because they were both strong and cost less than wood screws.
Frame Drawing Diagram

Drawing #1 is the shelf framework: #1 are 12″ 1 X 2s, #2 are 10 1/2″ 1 X 2s, #3 are 46 1/2″ 1 X 2s.
Two of each length per shelf.
Frame is 12″ by 48″.
Drawing #2 shows screw placement.
Drawing #3 shows OSB on frame with dotted lines being the frame below the OSB and dots indicating screw placement.
Drawing #4 is attachment of finished shelf to 1 X 4 uprights with screws.
Placement of boards #2 depends upon where the holes for attachment of the light fixtures are located and should be directly above the holes.
The grow shelf is now completed except for hanging the lights and placing the plugs on it.
Placing The Electrical Boxes And Plugs
The PowerPAR grow lights have the power cord and a pull chain on the same end of the light.
The power cords are not long enough to reach a standard wall plug from underneath the top two shelves.
To remedy this situation I mounted a single gang electrical box on one of the 1 X 4’s on the back side of the grow frame at a convenient height so the power cord from the top grow light would easily reach a plug when the light was as high as it could be adjusted with the chains.
I did the same for the light mounted under the second shelf down also.
For the lights mounted above the bottom two shelves I placed the single gang electrical boxes, one about a foot off the floor and the other just above it.
I chose to mount 4 electrical boxes and 4 electrical plugs and covers so we had the option of adding a second PowerPAR light above each shelf, if we decided we wanted to later.
The single gang plastic electrical boxes have nails to nail them onto a stud in the wall.
I removed each nail and drilled two holes about 1 1/2 inches apart, one above the other, and used 2 dry wall screws that were 1″ long to attach the electrical boxes to a 1 X 4.
I have had a lot of experience wiring houses and even completely wired a 3600 square foot house we built several years ago.
That 3600 square foot house passed the electrical inspection the first time it was inspected.
But because of liability I will not be showing how to wire the electrical outlets and plugs.
If you wire them yourself, you are accepting the responsibility for the results.
If you choose to do it yourself you can get guidance from these two web pages:
https://www.hunker.com/13414120/how-to-wire-electrical-outlets-in-series
https://www.hunker.com/13414183/how-to-wire-a-three-prong-110v-ac-plug
If you do not want to accept responsibility for the results or do not feel competent to wire the outlets and plug you can hire a handy man to do it for you.
A Word About Grow Lights
LED grow lights use very little electricity for the light they put out.
This makes them usable even in an off grid electrical situation.
If you were to use non-LED grow lights, the cost of operating them will be a lot more.
Non-LED grow lights would not be compatible with an off grid electrical system because of the electricity they would use.
When starting seedlings to later transplant into your hoop house, greenhouse or outdoor garden or for growing produce indoors year around, the PowerPar LED grow lights (link to read reviews on Amazon) do an excellent job!
You can learn how we built our greenhouse style hoop house (with free plans to build your own) in “How To Build A Hoop House Style Greenhouse On A Tight Budget.”
So for indoor year around or winter growing of things like lettuce, spinach, herbs and other plants that do not flower, you can leave the grow lights on 24 hours a day if you want.
But, if the plants you are growing are ones that produce from flowers such as green beans, cucumbers or tomatoes for instance, they will need light at least 12 – 14 hours a day but not during the night.

Don’t try to use old 4′ shop lights and buy bulbs that are labeled sunlight.
They will have somewhere between 5000K (Kelvin) and 6500K heat out put but the lumen output is less than LED grow lights.
The result is your plants will grow thin and tall, (leggy) , and not do well.
We learned this the hard way even though we were lowering and raising the lights to keep just above the plants!
Likewise, you could put out some serious money for High Intensity Discharge Bulbs (HID Bulbs).
They put out a lot of light but can cost more per bulb than the 4′ PowerPAR grow lights and they use a lot more electricity.
Besides, you usually need more than one of them per application.
HID bulbs come in many different types.
Some of the types are High Pressure Sodium, Metal Halide, Low Pressure Sodium, and Mercury Vapor.
But all of them cost more to buy and operate than LED grow lights and rarely give better results.
If you must go with an HID bulb, only High Pressure Sodium and Metal Halide are suitable for indoor use.
We could not be any happier than we are with the PowerPAR 4′ LED lights! (link to read reviews on Amazon)
They work great for starting seedlings indoors, growing our salad greens and herbs indoors during winter and also for hydroponics.
This grow frame also works well for hydroponics as a method for growing leafy produce and herbs indoors during winter or all year round.
We would not be able to grow during the winter indoors if it were not for these PowerPAR 4′ LED lights.
We have found that focusing more light on the plants helps them to grow even better.
In hydroponics stores you will see this done by the use of a thick silver foil, like aluminum foil, attached on three sides of the hydroponic shelves.
That foil is fairly expensive. We found a less expensive alternative.
We use one or two Emergency Blankets, depending on the height of the shelves.
These are the foil blankets sold in outdoor stores that come in a package that is about 3″ X 4″ and 1″ thick.
They are designed to fit in a pocket and be used if you are lost in the woods.
They reflect up to 80% of your body heat back to you.
These Emergency Blankets work great. They reflect a lot of the light and heat back to the plants.
The light and heat given off by the PowerPAR lights and reflected by the Emergency Blankets does not give too much heat that can damage the plants.
We use a few pieces of packing tape to hold the Emergency Blanket on three sides of the shelves.
Related Questions
Do you add any heat to help the plants grow indoors in winter?
No, we keep the plants in a room that is the same temperature as the house.
About 70 degrees F in day time and about 65 degrees F at night.
Doesn’t adding heat help seedlings germinate and grow in potting soil when you want to start plants indoors and then transplant them to your garden?
Yes, when we start seeds in Seed Starting Plugs we usually place a heating pad underneath the tray containing the plugs until after they sprout.
This method is talked about in “Tips On Getting An Early Start for The Spring Garden.”
Do you only start seedlings indoors to transplant in your outdoor garden?
No, we also start seedlings to transplant into our hoop house style greenhouse.
When we do this we get a few weeks head start on our growing season and our growing season can be extended a few weeks longer.
This is important when you live in a northern climate as we do.
