A great way to increase your garden’s output of produce without increasing the garden size is to use raised trellis planters.
Raised trellis planters allow plants to grow up instead of out.
In this article you will acquire a knowledge of why they are so beneficial for your garden and how to make a simple raised trellis planter in a couple of hours.
- This trellis planter is simple to make.
- You can grow plants on both sides of the trellis
- Several of them can be made for a low cost
This simple trellis planter is functional, looks nice and adds to any garden.
Why A Raised Trellis Planter?
Vegetables like cucumbers and several varieties of squash are vines that either go up or run over the surface of your garden.
Many varieties of beans are runners that climb.
If they have a way to grow up instead of out, you receive several benefits:
- they are easier to harvest, no bending down, squatting or kneeling to pick them
- the garden has a much neater appearance
- you have more garden space for other plants

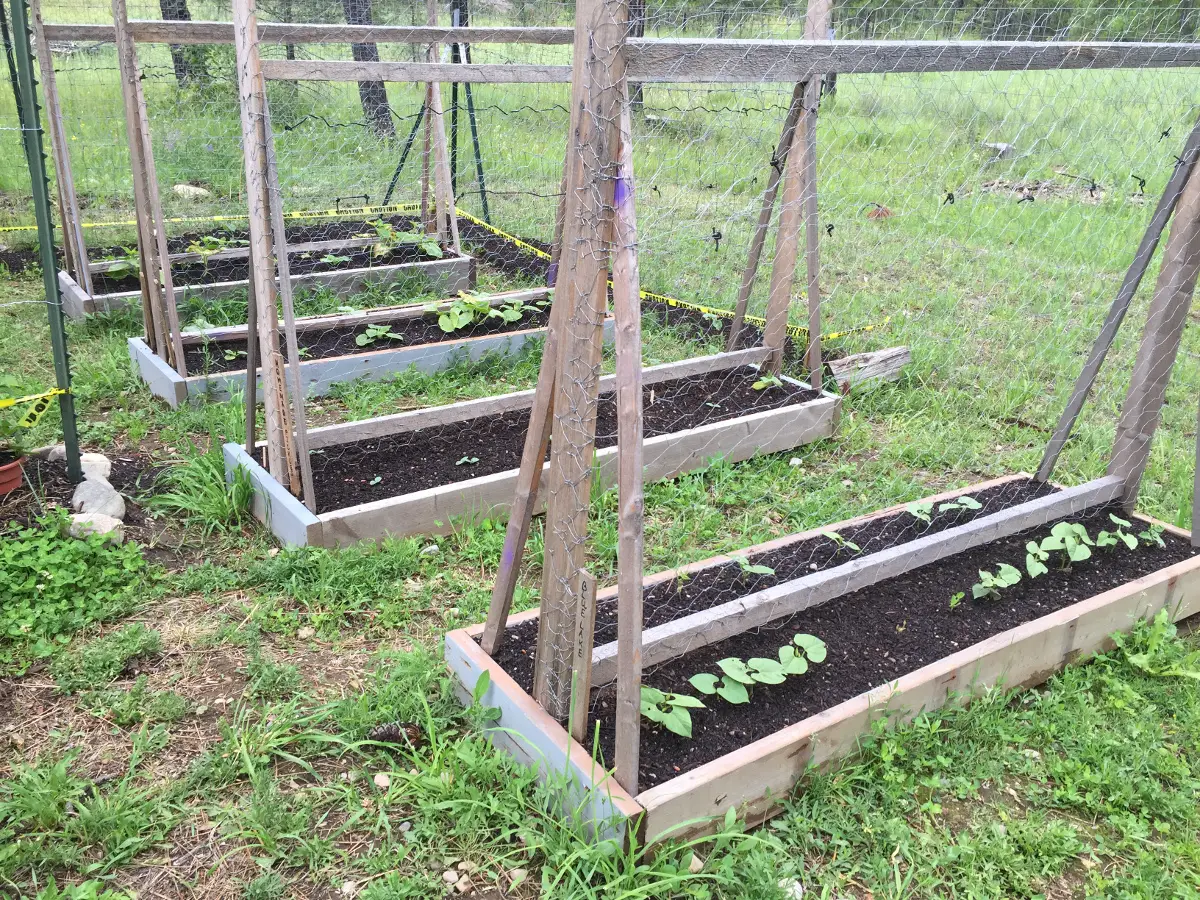
We have 5 of these trellis planters in our homestead garden.
They are sturdy and this will be our fifth year to use them. They look as good now as they did when we first built them.
They are a valuable addition to any garden.
The base of these trellis planters are 2′ X 6′ and they are 8′ high.
Materials List
Two 8′ 2″ X 6″ boards (you can use 2″ x 8″, 2″ X 10″ or 2″ X 12 ” board for a deeper planter)
Two 8′ 1″ X 3″ boards
Two 8′ 1″ X 2″ boards
Three 6′ 2″ X 2″ boards
12′ of 36″ high chicken wire
(12) 2 1/2″ long wood screws, more if using 2″ X 8″, 2″ X 10″ or 2″ X 12″ boards
(22) 2″ long wood screws
(16) 1 1/2″ long wood screws
Staple gun with 3/8″ long staples
8′ of fine diameter wire or sturdy nylon cord such as parachute cord
If you have moles or gophers in your garden you may want to cover the bottom of the planter with 1/4″ or 1/2″ hardware cloth stapled on with 3/8″ staples
Tools Needed
Tape Measure
Pencil
Phillips Screw Driver
Hand Saw or Skill Saw
Drill if you desire drilling pilot holes for the screws
Constructing The Planter
Start by measuring and cutting the 2″ X 6″ boards to 6′ long. Save the 2′ lengths that were cut off.
If you choose 2″ X 8″, 2″ X 10″ or 2″ X 12″ boards instead of 2″ X 6″ boards, measure and cut them at 6′ and save the 2′ lengths you cut off.
On a level surface, lay out the 4 boards, 2 of them 6′ long and 2 of them 2′ long so they form the base of the planter.
The 2′ long boards should cover the ends of the 6′ long boards.
Connect the boards with the 2 1/2″ wood screws placed about 2″ apart through the ends of the 2″ boards and screwed into the ends of the 6′ boards.
Once these boards are connected together, if you are going to cover the bottom with hardware cloth, turn the frame over and cover the bottom with hardware cloth that is 2′ wide and 6′ 3″ long.
The 3/8″ staples work well here. Once the hardware cloth is attached, turn the frame back over so the hardware cloth is on the bottom.
Next place the 1″ X 3″ 8′ boards in the center of each end as uprights.
Secure them with 3 or 4 2″ wood screws staggered so as not to split the 1″ X 3″s.
This is a place where you may want to drill pilot holes a size smaller than the diameter of the wood screws to keep from splitting the 1″ X 3″s.
This will also make attaching to the 2″ thick boards go easier.
Next cut the 1″ X 2″ boards in half giving two boards of 4′ length from each 1″ X 2″ 8′ board.
Place 2 of them in each end of the frame so they form supports for the 1″ X 3″ uprights.
You may want to bevel the ends of the 1″ X 2″ boards so they attach to the 1″ X 3″ boards easier.
Secure the 1″ X 2″ boards at the top and bottom with 2 1 1/2″ wood screws on each end.
This is also a good place to drill pilot holes for the screws.
Next take a 6′ 2″ X 2″ board and place it between the uprights about 2″ above the level of the planter box frame.
Caution: Measure the distance between the uprights first!
You will probably need to cut about 1 1/2″ off the 6′ 2″ X 2″ board to make it fit.
Connect the 2″ X 2″ board to the uprights with 2 2″ wood screws on each end. Pilot holes will help here also.
The next 2″ X 2″ cross bar is placed directly above and resting on the top of the 1″ X 2″ angled supports.
Be sure to measure the distance between the 1″ X 3″ uprights and cut the 2″ X 2″ board to fit.
Use 2 2″ wood screws to secure each end of the 2″ X 2″ cross bar to the uprights.
Pilot holes will make this easier again.
The final 2″ X 2″ cross bar is placed about 6″ to 8″ below the top of the uprights in the same manner as the other two crossbars were attached.
Measure to see how much may need to be cut off the 2″ X 2″ cross bar and secure it with 2 2″ wood screws at each end.
Pilot holes will help.
At this point you can paint or seal the wood surfaces if you so desire.
The final stage of construction is to attach the chicken wire to the uprights and cross bars using the staple gun and 3/8″ staples.
The two lengths of chicken wire will overlap some in the middle of the trellis.
Connect the two pieces of chicken wire together with an 8′ length of fine diameter wire or 8′ of parachute cord.
I used parachute cord.

On the trellis planter shown in the pictures I used 1″ mesh chicken wire.
However, on another trellis planter I used the 2″ mesh chicken wire.
After four complete growing seasons it appears that the 2″ mesh chicken wire works just as well as the 1″ mesh and the 2″ mesh costs less.
You are now ready to place your trellis planter in the garden to get ready to plant!
Placement In The Garden
I leveled a 2′ X 6′ space and put down about 4 layers of newspaper before placing the trellis planter in place.
The newspaper kills the grass or weeds so they do not grow up into the planter.
Over time the newspaper deteriorates and helps improve the soil beneath the planter.
We had 2″ X 6″ boards available to us and we used what we had.
We filled the planter boxes with a mixture of top soil and aged wood chips that were 7 or 8 years old and a dark black in color.
The aged wood chips were a mixture of pine, fir and larch (tamarack).
They did not have any cedar mixed in.
Cedar is not a type of wood chips that is good for vegetables.
Advantages For This Design Of Trellis Planter
Virtually all trellis planters we had seen before had the trellis in the back of the planter.
So all plants were planted in front of the trellis.
This meant that only half of the trellis was being used by plants.
By placing the trellis in the middle of the planter we are able to plant twice as much in each planter.
And the plants can use both sides of the trellis to grow up on.
Using chicken wire instead of slats as on many trellis’ gives the climbing plants lots of places to hold on to as they grow upward.
Another advantage of this design of trellis planter becomes apparent in the winter.
Because chicken wire makes up the trellis, when the winter winds blow, they blow right through the trellis without damaging it.
There are no slats for the wind to blow against or blow off the trellis and have to be replaced before planting.
If you are growing something heavy on this trellis planter, such as Spaghetti Squash, there are many places you can attach a sling of old panty hose or similar material to support the squash.
This can also increase your yield by keeping the squash from falling off the vine.
Although we find that usually the plants grow strong enough to hang onto their fruits.

In this picture the panty hose sling has been partially slid back to show that this Spaghetti Squash has achieved a length of 8 inches.
We have enjoyed using our trellis planters.
They have given us a way of growing a lot of food in a relatively small space.
The fact that we can harvest produce by merely reaching out and picking it has advantages over having to bend over to pick produce.
There are several ways to add on to these trellis planters.
We have hung flower baskets from the outside of the uprights.
These flower baskets can contain flowers that either repel unwanted bugs or attract wanted bees to help pollinate the plants growing in the trellis planter.
It is a simple matter to connect two or more trellis planters together at the top, where the uprights extend above the top cross bar.
This could be done if you wanted to grow grapes, thornless blackberries or other produce and wanted to be able to walk underneath the archways formed by the two or more connected trellis planters.
A connecting mesh work of 1″ chicken mesh would give good support for grapes vines or blackberry canes to be trained to grow between the trellis planters.
Even growing cucumbers or green beans would be nice here as the vegetables would hang down making it very easy to pick.
Try a few of these trellis planters in your country or homestead garden.
You will like the results obtained from them.
If you live in the city or suburbs and want to have a garden but are short on space, several trellis planters could be the answer you are looking for.
You could put one on a balcony or several on a back deck and grow a lot of produce in a small space.
Related Questions
Can you make a solid bottom in a trellis planter if it is on a balcony or deck?
Yes, a good material to make a bottom out of is 7/16″ CDX plywood.
Plywood made for outdoor use.
I’d drill several holes of say 1/4″ diameter in the bottom to allow excess water to leak out so as not to drown the roots of the plants.
Could you grow small watermelons such as Sugar Baby or personal size melons on this type of trellis planter?
Yes, I believe you could.
I’d want the chicken wire to be the 1″ mesh-stronger than the 2″ mesh.
Also I would be sure and support the melons with a sling of panty hose or other material to keep them from pulling loose from the vine before they were ripe.
Could I use the base of the trellis planter, without making a trellis, as a raised bed for a balcony or deck?
Yes, that would work great for a raised bed in a narrow space.
Also you could build the size to match what was available.
Say a 3′ by 5′ raised bed instead of a 2′ X 6′ raised bed if you had the space.
Don’t forget to make a solid bottom if using it on a balcony or deck.
Drill several 1/4″ holes in the bottom to allow excess water to leak out and not drown the roots.
